
XFur Studio™ 4 consists of several components that work together to render efficient, high quality fur. The main two components that you will use for your creatures are Fur Strands Assets, which describe the appearance of the fur strands through “dot” based textures, and the XFur Studio Instance which controls and renders the actual fur for a Mesh or Skinned Mesh Renderer.
Fur Strands Asset
Fur Strands Assets are Scriptable Objects that contain a reference to a Strands Texture Map. These textures define the appearance, size and distribution of the “strands” that are displayed by the XFur Studio Instance.
Important Notice: XFur Studio™ does not render fur through actual strands of simulated point-based or polygon-based geometry. Instead, it uses a shells-based approach. This method is faster on older hardware and more compatible with lower end devices as it requires neither compute nor geometry shaders.
These Strand Texture Maps can be generated or hand-made in the digital drawing software of your choice and then assigned to the Fur Strands Asset manually, or they can be procedurally generated by the Fur Strands Asset itself. The latter method is preferred, as it allows for faster iterations and ensures that the output is always in the format expected by the shader.
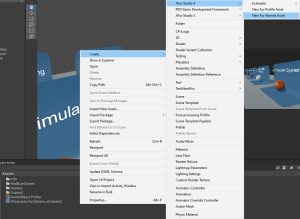
To create a new Fur Strands Asset, right click anywhere in your Project Panel and navigate to “Create/ XFur Studio 4/New Fur Strands Asset”
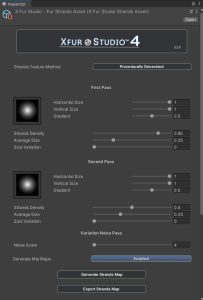
The newly generated Fur Strands Asset presents plenty of options:
-
Strands Texture Method: Controls whether the Strands Map will be procedurally generated or a manually assigned external texture.
-
First Pass Settings: Controls the appearance and distribution of the “main” set of strands.
-
Second Pass Settings: Controls the appearance and distribution of the “second” set of strands.
-
Variation Noise Pass: These settings control an additional blue channel Perlin Noise pass, to help with color variation control over the fur.
-
Generate Mip Maps: Enables the mip-map generation in the resulting texture.
-
Generate Strands Map: Generates the procedural Strands Map Texture and saves it as a Sub-Asset.
-
Export Strands Map: Once generated, the resulting map can be exported as a PNG texture to be edited in an external software.
XFur Studio Instance
The XFur Studio Instance component is the main script that handles fur rendering for a given model. From it you can access all rendering settings, modules, features and the XFur Studio™ Designer window, to style the fur within the Unity Editor.
Important Notice: The XFur Studio Instance component is fully compatible with both Skinned and Static meshes. It is not compatible with Alembic meshes. It also requires a GameObject.
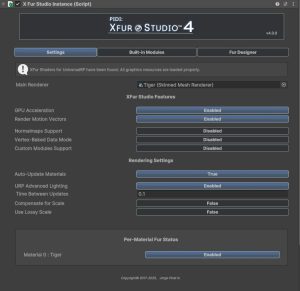
There are three main panels to the UI of the XFur Studio™ Instance Inspector: Settings, Built-in Modules and Fur Designer.
Settings Panel
-
Main Renderer: This is the renderer that will display the fur. It can be either a Skinned Mesh Renderer or a Mesh Renderer. For models with multiple LODs you must select the LOD0 renderer.
-
GPU Acceleration: Enables the use of Vertex Buffers to transfer the data from your mesh to the fur. This ensures that the skinning applied to your model is transferred through the GPU, rather than with the more costly (and CPU-based) Bake command.
-
*Render Motion Vectors: For the Universal Rendering Pipeline (Unity 6+) and the High Definition Rendering Pipeline (Unity 2021+), XFur Studio™ now offers full support for Motion Vectors. This ensures that Temporal Anti-Aliasing, Motion Blur and other effects work flawlessly out of the box.
-
Normalmaps Support: Enables the use of normal maps with the fur itself. This is in most cases not necessary as it can make the fur look strange (as it removes some of its softer, fluffier look).
-
*Vertex-Baked Data Mode: Forces XFur Studio™ to read the fur styling and grooming data from the vertices of the mesh rather than from textures. This saves memory, but requires you to bake your styling choices through XFur Studio™ Designer.
-
*Custom Modules Support: Enables the use of custom modules to expand the functionality of XFur Studio™ at any point of the rendering process. They work similarly to the built-in modules, such as the Physics or the VFX module.
-
Auto-Update Materials: Automatically applies any changes done to the fur every given seconds (defined in the Time Between Updates field)
-
URP Advanced Lighting: Available in the Universal Rendering Pipeline only. Switches between the default PBR based lighting used in the Lit material and a custom, more realistic model with support for anisotropic highlights.
-
Compensate for Scale: Applies small adjustments to the fur length, thickness and other values to account for the scale of the model (useful for characters / creatures that are too small or too big).
-
Use Lossy Scale: Whether to use Local or Lossy Scale values as a reference when compensating.
-
Per-Material Fur Status: Whether a given material of the renderer will display fur or not. Useful to make sure that some materials (clothes, eyes, etc) do not render fur.
* Not available in XFur Studio™ 4 – Core Edition.
Built-in Modules Panel
The actual functionality of each Module as well as how to use them will be discussed in detail in the Advanced Topics section of this documentation.
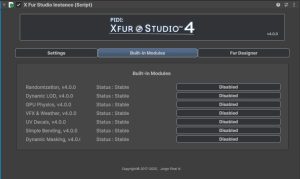
In the Built-in Modules tab you can enable or disable the different modules included with every XFur Studio™ Instance. All modules are compatible between themselves, and their status is displayed in the inspector itself.
Stable modules have been thoroughly tested, Beta modules are ready to use but may present some issues and require further testing, while Experimental modules are an introduction to potential new features that may or may not become a part of the full XFur Studio™ suite, and should not be used in a full production. All built-in modules are, on release, considered to be Stable.
Fur Designer Panel

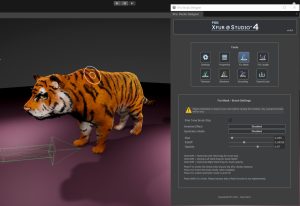
All fur editing, styling and grooming is done through a separate in-editor window called XFur Studio™ Designer. To launch this window you select the Fur Designer tab in your XFur Studio Instance, pick which material to edit from the drop-down menu and then click on the Enter Edit Mode button.
XFur Studio Designer is a complex and fully featured set of tools, and as such it will be covered in detail in the “XFur Studio Designer” section of this documentation.