
Upgrading an XFur Studio Instance from version 3 to version 4 is a very easy process. Do not remove your installation of XFur Studio™ 3 / XFur Studio™ Core until all of your models and content have been upgraded successfully.
First, unpack one of the unity package files inside of the “XFur Studio 4/Source Code/XFur Studio 3 Upgrade” folder. These packages add the necessary code bridges that will make the upgrade process smooth and painless.
Important Notice: If you are upgrading from XFur Studio™ Core to XFur Studio™ 4, please make sure to unpack the “XFCore_To_XF4_UpgradeExtensions” file. If you are upgrading from XFur Studio™ 3 Personal, Team or URP Editions, unpack the “XF3_To_XF4_UpgradeExtensions” file instead.

Once the package has been successfully unpacked and its contents imported into your project, you are ready to begin the upgrade process.
On each model using XFur Studio™ 3, add the corresponding XFur Studio™ 4 Instance component as well. Then, right click on the XFur Studio™ 4 Instance component and click on the “Auto-Upgrade XFur Studio™ 3 / Core Instance” option.
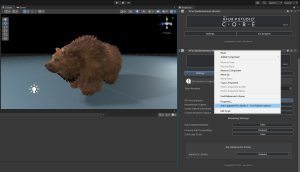
Once the process is done, the old version 3 instance will be disabled while keeping the fur rendering as close as possible to the previous version. The upgrade process in XFur Studio™ 4 is always non-destructive.
Important Notice: A few changes have been made to how color variation is handled, which means some tweaking may be necessary to achieve a 1:1 look. Our new color variation options offer much higher control over the final appearance of the fur however, so you may not want to revert back to XFur Studio™ 3 standard color variation setup.
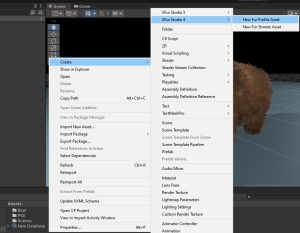
To upgrade Fur Profiles, first create a brand new XFur Studio™ 4 – Fur Profile Asset anywhere in your project.
Once created, select it and right click on its inspector to bring up the context menu. Then click on the “Auto-Upgrade XFur Studio 3 Profile” option.
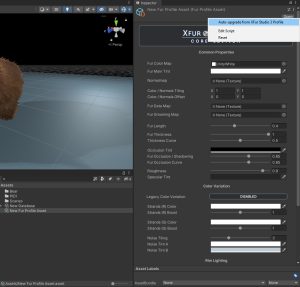
This will display an “Open File” dialog from where you can select the XFur Studio™ 3 Fur Profile that you want to upgrade. Once selected, the XFur Studio™ 4 Fur Profile Asset will copy all the relevant content from the XFur Studio™ 3 one.
Important Notice: While upgrading, the actual texture from Fur Strand Assets from version 3 will be referenced by the version 4 Instances and profiles, ensuring that the fur appearance is preserved.
Fur Strands Assets can be upgraded in exactly the same way. You create a Fur Strands Asset for XFur Studio™ 4 first, then select it and right click on its inspector. You select the Auto-Upgrade option and then the old Fur Strands Asset that you wish to upgrade.