
To better understand how XFur Studio™ Designer works and to get a hands-on experience using it, we have decided to approach this section of the documentation as a small tutorial.
If you are using XFur Studio™ Core, a small 3D model called “Eustace the Cat” is included with the asset.
If you are using XFur Studio™ 4 – URP, Personal or Team Editions you can use the Tiger demo model included with the asset. For this guide, we will use the Tiger model.
In an empty scene, drag and drop the Tiger model from the Demos/Tiger folder, then add the XFur Studio Instance component to it.
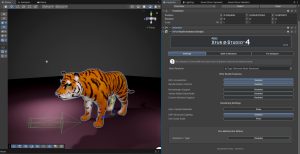
Once added, the component will automatically detect the first renderer it can find (in this case, the correct Tiger Skinned Mesh Renderer component).
A small box will indicate whether all the resources for the current rendering pipeline have been loaded successfully:

If they have been loaded successfully, proceed now to ensure that GPU Acceleration is enabled and, if available, the Render Motion Vectors setting is enabled as well.

Once this is done, enable fur for the main material in the tiger model.

The fur of the tiger will not look correct at first. This is to be expected, as it has not been configured at all.

Let’s open now the Fur Designer tab, select the Tiger material and Enter Edit Mode. The main XFur Studio™ Designer window is composed of two main panels, the Tools Panel and the actual inspector for each tool.
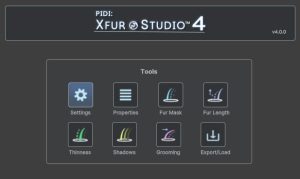
In the actual tools panel we have the Settings and Properties tabs, as well as brushes for the fur’s mask, length, thinness, shadows and grooming. An extra tab to Export and Load the styling is also available. We will check each tool, one by one.