The properties tool is split into several categories.
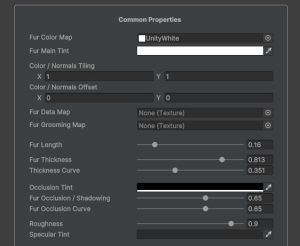
Common properties control the main tint, styling and grooming of the fur.
-
Fur Color Map: It is the equivalent of the Albedo map in the Standard / Lit shader. We will assign our Tiger’s albedo map here.
-
Fur Main Tint: Applies a tint to the fur’s color. In this tutorial, we will leave it white.
-
Color / Normals Tiling and Offset: The tiling and offset to be applied to the UVs of our model.
-
Fur Data Map: The texture map containing the per-vertex styling of our model (fur length’s, thickness, occlusion, etc). While a map is provided for the Tiger model, we will create our own in this tutorial.
-
Fur Grooming Map: The texture containing the per-vertex grooming for the fur of our model. While a map is provided for the Tiger model, we will create our own in this tutorial.
-
Fur Length: Controls the overall length of the fur. It should be as long as the longest section of the fur will be. For this tutorial, we will set it at 0.16.
-
Fur Thickness: Controls the overall thickness of the fur strands. We will leave it at 1.
-
Fur Thickness Curve: Controls how the thickness of the fur changes from the root to the tip of each strand. We will set it at 0.4.
-
Occlusion Tint: The tint of the shadowing / occlusion applied to the fur. We will leave it as is.
-
Fur Occlusion / Shadowing: The intensity of the shadowing applied to the fur. It is modulated by the blue channel of the Strands map. We will set it at 0.65.
-
Fur Occlusion Curve: The intensity of the shadow as it goes from the root to the tip of a fur strand. We will set it at 0.5.
-
Roughness: How shiny the fur will be. We will set it at 0.9.
-
Specular Tint: Controls the color and therefore the intensity of the specularity / shininess of the fur. We will set it to a nice dark orange RGB(100, 50, 15).
At this point, our tiger should be looking a lot better already:
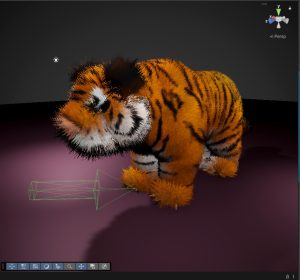
Let’s move on to the next set of parameters.
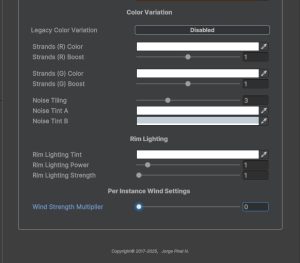
Color Variation controls the way that the fur’s tint and color will change from one part of the creature to the next. It has two modes, Legacy and Standard.
The Standard mode, enabled by default, adds certain randomization and noise passes to make the fur look more natural without any additional textures.
The Legacy mode uses an additional texture to define up to four different tints to be mapped to each of the texture’s color channels. For this tutorial, we will leave the Legacy Color Variation mode disabled.
Now let’s go over the next settings one by one.
-
Strands ( R ) Color: The color to be applied to the red strands (red dots) in the Strands Map. We will leave it white.
-
Strands ( R ) Boost: Multiplies the color of the red strands by this number, allowing you to make them lighter or darker than the rest of the fur. Set it to 1.1.
-
Strands ( G ) Color: The color to be applied to the green strands (green dots) in the Strands Map. We will leave it white.
-
Strands ( G ) Boost: Multiplies the color of the red strands by this number, allowing you to make them lighter or darker than the rest of the fur. Set it to 2.
-
Noise Tiling: The tiling applied to the additional noise pass that modifies the tint of the fur. Set it to 2.75.
-
Noise Tint A: The main color applied to the white parts of the noise. Leave it white.
-
Noise Tint B: The color applied to the black parts of the noise. We will use a “dirty” yellow tone RGB(210,190,150).
The Rim Lighting settings allow you to simulate a bit of transmittance on the fur while making it look fluffier.
-
Rim Lighting Tint: The color used for the Rim Lighting Effect. We will use a light peach color RGB(255, 200, 150).
-
Rim Lighting Power: Controls the thickness / thinness of the rim effect around the model. We want a thin rim, so we will set the value to 3.8.
-
Rim Lighting Strength: The strength of the rim lighting itself. We will set it to 1.4.
Finally, the Per Instance Wind Settings allow you to modify the strength of the wind effect applied to each instance. This way you can make the wind effect milder or stronger as needed, which can be useful for smaller or bigger creatures. For now, let’s set the Wind Strength Multiplier to 0. With that, our tiger will be looking a lot better already.